Table of Contents
Exploring Classical Guitar Nail Shape Options
Classical guitar nail shapes are very important for players using the technique of fingerpicking – where the player plucks the string using their fingertips instead of using picks. Keeping short nails and plucking with the fleshy part of the fingertips is possible, but doesn’t yield the best of tones, especially in classical guitars that use nylon strings. Ultimately, players end up using their nails for fingerstyle playing.
So, as a classical guitarist, your nails are one of the most important tools for producing a clear and resonant sound. Maintaining the shape and health of your nails is essential for achieving the best possible tone and for preventing nail-related injuries.
In this article, we’ll explore some tips and techniques for keeping a proper classical guitar nail shape for developing your fingerstyle playing.
Before we dig deep, have you checked some of our must-have classical guitar accessories?
Classical Guitar Nail Shape Length
While it is possible to play classical guitar without nails, there are some benefits to having them at a specific length for your playing. The length of your nails is critical to producing a good sound on the classical guitar. Nails that are too short can be painful to play with and may not make a clear sound. Nails that are too long can be prone to breakage and may create an uneven tone. Let’s find out what happens with different types of nail length and shape.
Short nails
Short nails are typically defined as being even with the fingertip or only extending slightly beyond it. Beginners often prefer short nails, which are less likely to break and easier to maintain. Additionally, short nails can produce a warmer, more mellow sound because the contact with the string is evenly distributed between the nail and the flesh.
This allows for more nuanced control over dynamics and tone. Also, it reduces the risk of catching the string with the flesh, which can lead to smoother and more controlled sound production. However, short nails have a disadvantage. Short nails may hinder the ability to play very fast passages efficiently, as there may be insufficient nail surface for smooth string traversal.
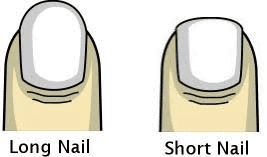
Long nails
Long nails typically extend 2-3 millimeters beyond the fingertip. They can produce a brighter, more projecting sound and help play specific classical guitar techniques, such as tremolo and Rasgueado. This can be desirable for certain musical contexts.
However, if nails become excessively long, they may produce a brittle or overly bright sound, which may not be suitable for all pieces or musical preferences. Long nails are also more likely to break and can be more difficult to maintain.
Ideally, your nails should be long enough to extend beyond the fingertips. This length allows you to produce a clear, resonant sound without risking breakage or injury. Consult a guitar teacher or a professional nail technician if you’re unsure about the appropriate length for an ideal classical guitar nail shape.
How to Shape your nails for classical guitar?
For classical guitarists, the shape of your nails is just as important as the length when playing clean fingerstyle guitar. Fingernail shape is a critical factor that can significantly impact your tone, technique, and overall performance.
Understanding Different Fingernail Shapes
Classical guitarists use various nail shapes, each with its advantages and disadvantages. Here’s an overview of the most common nail shapes.
Round nails
Round nails are the most common shape for classical guitar. They are easy to shape, maintain, and produce a warm, mellow sound. However, round nails can be less projecting than other shapes and may not be as well-suited for specific techniques, such as tremolo and Rasgueado.
Sloped nails
Sloped nails are filed at a slight angle so that the edge of the nail is thicker than the base. This shape produces a brighter, more projecting sound than round nails, and it is also well-suited for playing tremolo and Rasgueado. However, sloped nails can be more challenging to shape and maintain than round nails.
Flat nails
Flat nails are filed straight across, with no angle. This shape produces the brightest, most projecting sound but is also the most difficult to shape and maintain. Flat nails are also more likely to break than other shapes.
Pointed nails
Pointed nails are the least common shape for classical guitar. They are difficult to shape and maintain and can produce a harsh, biting sound. However, pointed nails can help play specific techniques, such as Rasgueado and flamenco.
Advantages and disadvantages of different nail shapes
| Nail shape | Advantage | Disadvantages |
| Round | Easy to shape and maintain; produces a warm, mellow sound | Less projecting; may not be as well-suited for certain techniques |
| Sloped | Produces a brighter, more projecting sound; well-suited for playing tremolo and rasgueado | More difficult to shape and maintain than round nails |
| Flat | Produces the brightest, most projecting sound | Most difficult to shape and maintain; more likely to break |
| Pointed | Useful for playing certain techniques, such as Rasgueado and flamenco | Difficult to shape and maintain; can produce a harsh, biting sound |
How to Find the Perfect Nail Shape that Suits You
Here’s a useful method for discovering the ideal nail shape for your classical guitar playing:
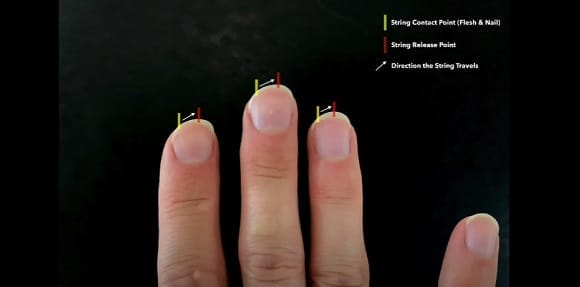
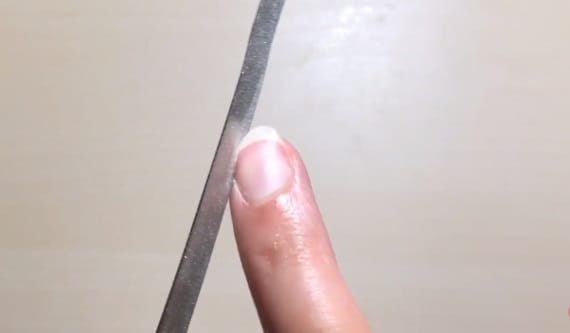
- Take a piece of fine sandpaper, preferably 500 grit or higher, and wrap it around the third string close to the soundhole at your right hand’s playing position.
- Use your left hand to secure the sandpaper in place, and then proceed to play as you normally would with your index (i) finger.
- Repeat this process multiple times while periodically inspecting the underside of the nail. After a few repetitions, a white outline will form, indicating the exact point of contact between your nail and the string.
- Using a nail file, shape your nail along the line that the sandpaper has marked on it.
- Continue this procedure for your other fingers as needed, relocating the sandpaper to different strings when adjusting the shape of each nail.
Tools You Will Need
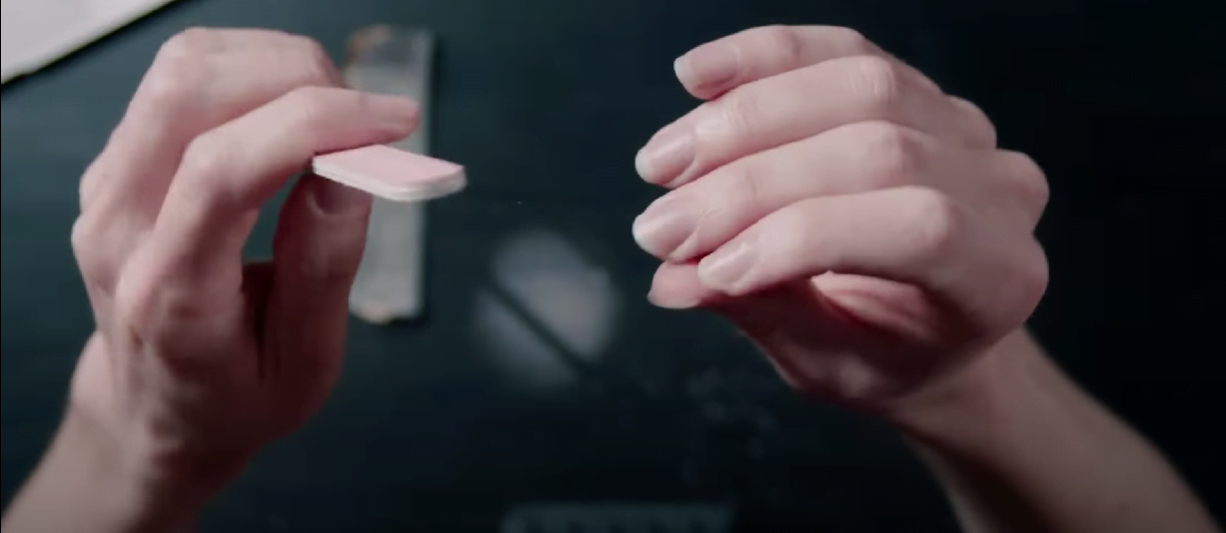
Nail File: A high-quality, fine-grit nail file or emery board is a fundamental tool for nail maintenance. These files have a smooth texture that allows for precise shaping and smoothing of the nail edges and surface.
Nail buffer: A nail buffer can help smooth the nail surface after shaping. This will give your nails a polished finish and help to prevent them from catching on the strings.
To use a nail buffer, rub it over the surface of your nails in a circular motion. Start with the grittiest side of the buffer and work your way up to the finest side.
Nail clippers: Use nail clippers to trim your nails to an appropriate length before shaping. The ideal nail length for classical guitar is slightly longer than the fingertips
Nail brush: A nail brush is useful for removing any debris from your nails. This will help to ensure that your nails are clean and free of dirt and oil before you start playing.
Step-by-Step Approach
Shaping your nails for classical guitar is a crucial step in achieving the right tone and playability. Properly shaped nails can greatly enhance your control and precision when playing. Here’s a step-by-step guide on how to shape your nails for classical guitar:
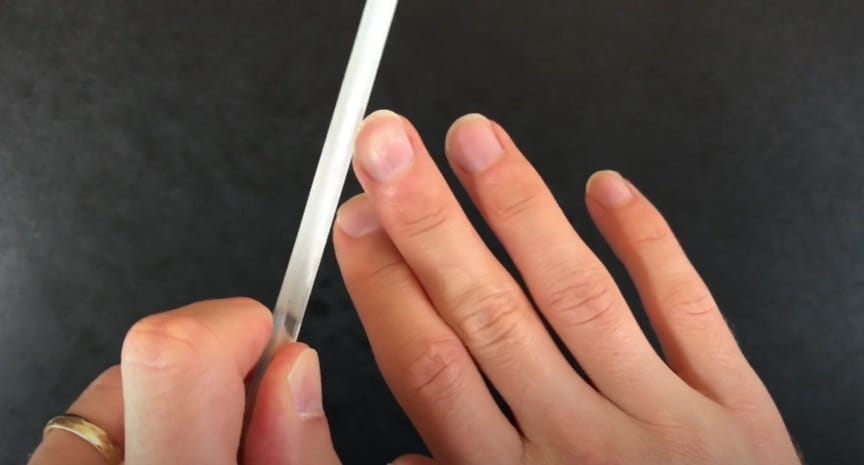
Step 1: Trim Your Nails
Start by using nail clippers to trim your nails to a manageable length. The ideal starting length varies from person to person, but generally, you want them to extend slightly beyond the fingertips. Avoid cutting them too short, as this can make it challenging to shape them effectively.
Step 2: File the Nail Length
Use the nail file to shape the length of your nails. Aim for a slightly rounded shape that follows the natural curve of your fingertip. This rounded shape provides better control when plucking the strings and minimizes the risk of snagging the strings with sharp corners. File each nail individually and maintain a consistent shape across all fingers.
Step 3: File the Nail Thickness
Next, you’ll need to file the thickness of the nail. Gently file the underside of each nail, known as the “nail ramp,” to create a gradual slope from the fingertip to the end of the nail. This ensures that the contact point with the string is smooth and even. Be cautious not to file too aggressively, as this can weaken the nail.
Step 4: Create the Right Bevel
To achieve optimal tone and control, create a beveled edge on each nail. This means that you’ll slightly round the top edge of the nail that contacts the strings. This bevel helps produce a clear and articulate sound. Use gentle, downward strokes with the file to create this bevel. Be sure to keep it even across all nails.
Step 5: Smooth the Nail Surface
After shaping the nails, use a nail buffer to smooth the surface of each nail. Take care that the sides are filed sufficiently to gain the proper curvature. The pointed end also increased playability, as prominent corners of nails tend to clash against strings and hamper movement.
It’s also important to keep your nails symmetrical. Check that each nail is shaped and filed in the same way to ensure an ideal classical guitar nail shape that brings out a consistent tone across all strings.
Step 6: Clean and Moisturize
Use a nail brush to clean any debris from under your nails and around your fingertips. Afterward, apply a moisturizing cream or oil to keep your nails and fingertips in good condition. Healthy nails are less prone to breakage.
How are thumbnails shaped for classical guitar?
To shape your thumbnail for classical guitar, you will need a nail file and a buffer. You can also use nail paper, which is a fine sandpaper that is specifically designed for shaping nails.
Here are the steps involved:
- Start by filling your thumb nail to the desired length. For classical guitar, the thumb nail should be slightly longer than the fingertips, about 2-3 millimeters.
- Once your thumb nail is the desired length, you can start to shape it. The most common nail shape for classical guitar thumb nails is the ramped nail. This shape is created by filing the nail at a slight angle so that the edge of the nail is thicker than the base.
- To file a ramped thumb nail, start by placing the file at the base of the nail and file your nails at a 30-degree angle. Work your way up the nail, following the curve of the fingertip.
- Be sure to file the nail evenly so that the ramp is smooth and gradual.
- Once you have filed the nail to your desired shape, use a buffer to smooth out any rough edges.
- Finally, use nail paper to polish the nail. This will give the nail a smooth finish and will help to prevent it from breaking.
How to Strengthen Nails for Classical Guitar?
Strengthening your nails for classical guitar playing is a crucial aspect of achieving the best tone and control. Nails predominantly comprise keratin, the same structural protein found in skin and hair.
To maintain strong and healthy nails, it’s essential for the body to produce an adequate amount of keratin. As such, guitarists aiming to strengthen their nails can benefit from a balanced diet rich in foods that support and promote keratin production. These foods include eggs, onions, salmon, sweet potatoes, sunflower seeds, mangoes, garlic, kale, and carrots.
In addition to a keratin-promoting diet, many guitarists turn to supplements to further enhance nail strength. Biotin, a B-complex vitamin, is a popular choice as it supports healthy cell growth and aids in metabolizing amino acids essential for protein building. Supplements like iron, magnesium, omega-3 fatty acids, vitamin C, and zinc can also promote rapid cell division and growth, benefiting the nails.
For tasks that could potentially damage your nails, such as gardening or household chores, consider wearing gloves to protect them. This simple step can prevent unnecessary wear and tear.
Be cautious with nail buffing. While some buffing can smooth rough edges, excessive buffing can thin your nails, making them more susceptible to damage. Use a gentle nail file with fine grit when shaping your nails.
Consider using a nail hardener specifically designed for strengthening nails. These products can provide an extra layer of protection and support for your nails.
If you need to wear nail polish, it’s advisable to choose a nail polish remover that is acetone-free when removing the polish. Acetone can contribute to breakages and drying out the nails.
Taking Care of Split Finger Nails
Taking care of a split fingernail, whether you’re a classical guitarist or not, is essential to ensure it heals properly and doesn’t interfere with your daily activities or playing. Here’s a step-by-step guide on how to care for a split fingernail:
Immediate Care with a Band-Aid
- If you’ve experienced a split or tear in your fingernail, the first step is to address it immediately. If possible, locate a clean band-aid.
- Open the band-aid packaging and place the pad (the non-sticky part) against the split fingernail. Make sure the adhesive part of the band-aid does not touch the nail, as this can cause further damage.
- The band-aid acts as a protective barrier to prevent the split from worsening and to minimize the risk of the nail catching on objects or clothing.
Temporary Repair with Glue and Tea Bag
When you have the opportunity for a more thorough repair, gather the following materials: nail glue, an empty tea bag or tissue paper, tweezers, and a nail buffer or file.
- Apply a small amount of nail glue directly to the top of the split or tear in the nail.
- Allow gravity to help distribute the glue along the tear. You can gently use tweezers to open the tear slightly and ensure the glue reaches inside to bond the nail together.
- Let the initial layer of glue dry for a short time.
- After the initial glue has dried slightly, apply another small dot or two of glue to the nail near the tear.
Strengthening with a Tea Bag Patch
- Cut a small piece of an empty tea bag that’s large enough to cover at least a sixteenth of an inch on either side of the tear.
- Place the tea bag piece over the glue on the nail. The fibrous material of the tea bag (or tissue paper) creates a reinforcing layer that adds strength to the nail.
- Allow the glue to saturate the tea bag fiber, bonding everything together.
- Let it dry partially.
Buff and Polish
- Once the glue has dried sufficiently, use a nail buffer or file to smooth the repaired area. Polishing between steps ensures a smooth surface without negatively affecting your tone or playing.
- Be cautious not to over-polish, as excessive buffing can weaken the patch. Polish, apply glue, let it dry, and polish again to achieve a smooth finish.
This DIY method can help you manage a split fingernail effectively and minimize disruptions to your guitar playing. It’s a cost-effective solution that can make the best of a challenging situation. With proper care and patience, you can maintain the functionality of your nails and continue practicing.
Check out this video for more details.
Cleanliness and Moisturizing
Keeping your nails clean is crucial for preventing the buildup of dirt and oil that can affect the sound quality of your playing. One of the best ways to keep your nails clean is to wash your hands frequently with soap and water. When you’re finished playing, make sure to remove any excess dirt or sweat from your nails with a soft brush or a nail-cleaning tool.
While keeping your nails clean and dry is important, it’s also essential to moisturize them regularly. Nails that are too dry can become brittle and prone to breaking, which can be painful and prevent you from playing your best.

To moisturize your nails, use a high-quality hand cream or nail oil. Massage a small amount into the nails and cuticles after washing your hands or after a playing session. Be sure to avoid using any products that contain harsh chemicals, as these can weaken the nails and cause damage over time.
Protect the nails!
It’s important to protect your nails from damage during everyday activities. Be careful when using your hands to do everyday tasks such as opening cans, typing on a keyboard, or washing dishes. Wear gloves when doing household chores to protect your nails from exposure to harsh chemicals.
If you’re still worried about damaging your nails while playing, consider investing in a nail guard. These small, plastic attachments can be fitted over your nails to protect them from wear and tear while playing. Cut the nails properly, keep them clean and moisturized and practice protection – there, your classical guitar nail shape is here to stay!
FAQs

- 6 Unique Guitar Picks That Will Blow Your Mind - February 6, 2025
- Master the Harmonic Major Scale And Intervals - February 6, 2025
- 9 Eye Catchy Unique Guitar Straps for Every Musician - February 6, 2025